dinner, instagram, recipe, side dish, vegetables

Best Damn Green Beans

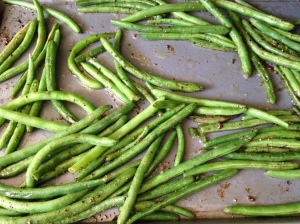
Green beans pre-roasting

First of all, Merry Christmas and Happy New Year! I had a relaxing holiday, filled with some indulgences (I made Hershey’s Kisses Christmas blossoms…..) and great time spent with family.

My parents just purchased a house in Chico, California. Chico is a cool, college town an hour and a half north of Sacramento. When I moved to New Hampshire for my internship last year, I envisioned Keene being very similar to Chico. It wasn’t anything like Chico (probably due to the fact that Chico was Los Angeles compared to Keene) but living in Keene has made me appreciate Chico much more. If you are every visiting Northern California, it is definitely worth a stop. Bidwell Park has something for everyone – biking, hiking, swimming, nature and the town has great shopping and dining. Some of my personal favorites are Tea Bar and Fusion Cafe and Three Sixty Ecotique.
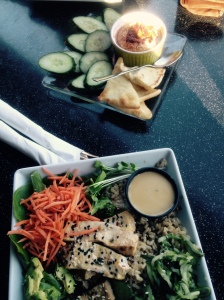
My meal from Tea Bar! Tofu bowl with Chipotle Sundried Tomato Hummus!

Why do I bring up Chico? Well while in Chico I happened upon an AMAZING farmer’s market. I love going to the farmer’s market and checking out the different stands, discovering new produce and striking up conversation with the farmers. It is one of the BEST ways to support your local economy and the small farms. My dietetic internship at Keene State College had an emphasis on food systems and sustainable agriculture. I was fortunate to work with some very passionate local foodies/RD2Be’s who were very knowledgeable about food systems and I was really able to learn and be more conscious of what I was eating and where it was coming from.

image6

Anyway, at the Chico farmer’s market I blacked out and spent all the cash I brought with me. My senses were overloaded with so many of my favorite things. There were stands of pickled vegetables, homemade lavender almond milk, walnuts that had been picked and shelled FIVE days ago, tons of winter squash, I really could go on. However, the one thing I bought that brings me to some damn good green beans is a small jar of crushed tomatillo peppers. I love all things spicy and stumbled upon a stand where the guy was selling homemade pepper blends. Talk about my kind of place. He had every kind of pepper spice blend a pepper lover like myself could want. I bought one without even sampling and am regretting that I didn’t buy more!

The pepper stand!
The pepper stand!

The spice blend is called the Zing Mix and it is a blend of dried tomatillo and peppers. It is perfect on just about anything. I have a batch of Zing Mix spiced tempeh marinating (recipe on the blog soon!) in the fridge and my green beans were pretty much amazing.

Zing Mix pepper blend

BTW this recipe is my favorite for green beans. Once you make them this way, I guarantee you won’t want to steam, sauté, microwave, etc again! The key is the squeeze of fresh lemon when they come out of the oven!

Best Damn Green Beans 

Ingredients

  • 1 pound trimmed and washed green beans
  • 2 TBS olive oil
  • Sea salt and black pepper
  • 2 tsp Zing Mix (or any mix of dried spices- I love no salt seasoning, garlic powder, cayenne, ground chipotle, don’t be afraid to experiment!)
  • 1/2 of fresh lemon

Directions

  1. Preheat oven to 375 degrees
  2. Spread green beans in an even layer on a baking sheet
  3. Drizzle olive oil over green beans
  4. Sprinkle generously with fresh cracked black pepper and add a pinch of sea salt. Sprinkle spice on top
  5. Roast in the oven for 15-20 minutes, tossing green beans half way through. I like my green beans slightly more crispy so I will cook them a bit longer.
  6. Remove from the oven and squeeze half a lemon over green beans
dietitian, dinner, instagram, main dish, nutrition, RD2Be, recipe, vegetable

Stuffed Bell Peppers, Greek Yogurt Dressings, and Other Musings

image (2)

Since moving back to LA and with more time on my hands (thank the lord!), I’ve been able to work out more and COOK more! Both the cooking and working out are helping me build back the good habits and back to my previous not-constantly-stressed-out-about-the-internship-life (post about the internship coming soon!). In between studying for the RD exam and job hunting, I have been able to focus on myself and my passions- running, working out and cooking.

With a little less than 3 months until the Nike Women’s Half Marathon in San Francisco, I have been trying to run, tone up, and eat healthy to lose a couple extra pounds that I gained during my dietetic internship (oh, the impact of stress!). While I like to focus on progress not perfection, I know that over the last month of my internship and the road trip back to LA, I did not make any sort of progress. So with that here I am, half marathon training and making stuffed peppers and Greek yogurt salad dressings!

Stuffed peppers are an easy go-to meal, incorporating all the food groups. I first made them while working at Camp Ronald McDonald at Eagle Lake as a food service intern. Then while living in New Hampshire, fellow my fellow intern (and roommate!) would make them for our house! Since being back  in LA my boyfriend has been the gracious recipient of my recipe experimentation and on the menu was stuffed bell peppers and salad with creamy green chile dressing! This recipe was also a use-up-all-the-leftovers-in-the-fridge kinda meal too!

I love using Greek yogurt as a dressing. Its creamy and tart texture imitate sour cream and the added dose of protein ain’t too bad either. I will add it to everything- tacos, tuna, watermelon (see my previous post!) and will make salad dressing out of it too! I’ll typically add an acid (think lemon juice/apple cider vinegar) and then spices and seasonings depending on the theme I am going with (cumin and cayenne pepper for Mexican, basil and garlic for Italian, etc). I love experimenting to create something new that will tantalize the taste buds and you typically can’t go wrong with doing it yourself! Much cheaper and healthier than buying a bottle of salad dressing!

Without further ado (thank you for reading this far!) here is the Stuffed Peppers recipe

Ingredients

  • 4 green bell peppers, tops sliced and seeds taken out (dice the tops to use with the meat)
  • 1 cup cooked quinoa (this was leftover quinoa pilaf that had carrots, celery, and mushrooms in it)
  • 1/2 pound grass fed ground beef (8o % lean)*
  • 1/2 c green enchilada sauce
  • 1/2 yellow onion, diced
  • 2 roma tomatoes, diced
  • 1 clove garlic, minced
  • 1 tsp cumin
  • 1/4 c shredded cheese
  • olive oil

Directions

  1. Preheat oven to 375 degrees F.
  2. Hit a pan over medium heat. Add a swirl of olive and bring to temp.
  3. Add onions and let them saute until fragrant then add the garlic.
  4. Add the cumin, pepper tops, and tomatoes and  cook down, allowing some of the juices to release and the vegetables to release some of their water and cook down (about 5 minutes).
  5. Add the ground beef and cook until browned. Throw in the quinoa and enchilada sauce and heat through.
  6. Remove from heat. Spray a baking dish and the outside of the peppers with nonstick spray. Fill the hollowed peppers with the meat mixture and top with shredded cheese.
  7. Cook in the oven for 15-20 minutes until the cheese is melted and browned.
  8. Serve with a side salad and avocado! Yum!

* You can also substitute ground turkey, chicken, or crumbled tofu for the stuffed peppers. This truly is a super versatile dish!

dietitian, gluten free, instagram, paleo, recipe, snack, vegetable, vegetarian

Oven Baked Okra Bites

photo-1

When I drove across the country to move to New Hampshire for my internship last summer, I was obsessed with Cracker Barrel. We don’t have it in California and it litters the highways from Utah to New Hampshire. So I did what every road trippin American should do – I stopped at Cracker Barrel!

Low and behold, I was surrounded with country decor like no other and a menu that had me salivating at every star, puzzle, plowhouse, and dog (a little food service menu design terms a la RD exam studying!). Cracker Barrel was no joke and I was in heaven.

The first time I tried okra was at CB. They were fried (of course) and I may or may not have eaten a few too many. Since this initial introduction to the Southern staple okra, I have been obsessed. During my food service rotation, they served them steamed and I loved their gelatinous but crunchy texture.

When I moved home this summer, I bought some beauties at the farmers market, marinated and skewered them on the BBQ – DELISH.

And now bringing me to today- wanna be Cracker Barrel – oven baked okra fries. I made these paleo, but you can certainly regular flour, buttermilk, add some cornmeal, etc.

photo

Ingredients

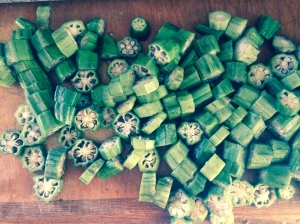
  • 1 pound okra, ends trimmed and sliced into coins
  • 2 eggs
  • 1 cup almond flour
  • 1 TBS garlic powder
  • 1/2 tsp chipotle chili powder
  • 1 tsp black pepper
  • 1/2 tsp cayenne pepper
  • pinch of sea salt
  • 1 tsp red pepper flakes
  • 1 tsp cumin

Directions

  1. Preheat oven to 425 degrees F. Line a baking sheet with foil and spray with cooking spray.
  2. Combine the almond flour with the spices in a shallow dish.
  3. Whisk the 2 eggs in a separate dish.
  4. Create a breading station. Add a few pieces of the okra to the egg wash, remove, and toss in the almond flour mixture. Spread breaded okra evenly on a baking sheet.
  5. Once all okra had been breaded, spray with cooking spray. Bake in the oven for 30 minutes. You may need to rotate the pans to ensure even browning.
  6. Remove when okra is golden brown and crisp. I dipped mine in Frank’s Red Hot! YUM!

Do you like Cracker Barrel? What are your favorite treats? Surprisingly my favorite is the chicken and dumplings…random but they grow on me every time I get them!

breakfast, dessert, dietetic intern, dietitian, gluten free, instagram, nutrition, RD2Be, recipe, salad, snack

Greek Yogurt with Blueberries, Watermelon & Basil

image-2

Summer in LA has brought warm temperatures and a plethora of summer produce. On a recent trip up north to Sacramento, California’s bounty was on full display. I picked up tree ripened nectarines, peaches, apricots, plums, and pluots of every variety along with okra and a sun ripened watermelon! (See our Instagram post last week for more info on how to choose a watermelon!)

I love taking a road trip to Northern California solely so that I can visit all the farms that dot the highways! They have some of the BEST produce I have every tasted and I love that I can meet the person who grew the food that I am about to DEVOUR! This recipe makes a great breakfast, snack, or dessert! The basil adds amazing flavor without having to add extra granola or sweetener. Lots of filling protein from the Greek yogurt and antioxidants from the berries, this recipe is sure to please! Plus the colors are so pretty, how could you resist?!

Ingredients

  • 3/4 c nonfat Greek yogurt (LOVE Fage brand- absolute creamiest nonfat Greek yogurt around!)
  • 1/4 c blueberries
  • 1/2 cup cubed watermelon
  • 2 basil leaves, torn into pieces
  • honey or agave (if desired)

Directions

1) Scoop Greek yogurt into dish. Top with blueberries and watermelon. Sprinkle basil on top.

2) Can drizzle with a little honey or top with homemade granola!

dietetic intern, dietitian, instagram, main dish, nutrition, paleo, RD2Be, recipe

Lemon Basil Cod

afterlight
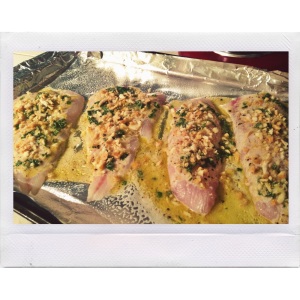
This lemon basil cod was a quick, last minute Monday dinner prep. After a weekend of celebrating Germany’s World Cup win (awesome game and overtime goal!), my boyfriend and I wanted to prepare a meal that was quick, healthy, and would cook while doing the P90x ab ripper! And voila- lemon basil cod was born.

Cod is a light, quick cooking fish, that when cooked is moist and flaky. Add a mustardy lemon sauce with fresh basil and it’s like summer is dancing on your taste buds! We served this with cast iron skillet sweet potatoes and Brussels sprouts and oven roasted lemon cauliflower (though my food service teacher from undergrad would be disappointed in my use of a white fish with white cauliflower-oh well!). We wanted to eat light and clean, so we limited the starches with this meal to the sweet potatoes and the crushed pita chip fish topping! 

Let us know what you think in the comments! Did you try the lemon basil cod? What are you favorite ways to prepare cod or fish? Any thoughts on the P90x ab ripper (it was my first time doing the any of the P90x series!)?

#getyournutritionon

Ingredients

  • 2 cod filets (around 6 oz each)
  • Juice from one lemon
  • 2 cloves garlic, minced
  • 2 heaping TBS german mustard
  • 2 TBS olive oil
  • 2 TBS chopped fresh basil
  • salt and pepper to taste
  • 4-5 pita chips, crumbled

Directions

1) Preheat oven to 400 degrees F. Line a baking sheet with foil and spray with cooking spray.

2) Combine lemon juice, garlic, mustard, olive oil, salt, pepper, and basil.

3) Pour marinade over cod.

4) Top with crumbled pita chips.

5) Bake for 5-10 minutes. Fish should become opaque and flake easily.

6) Eat and enjoy!


dietetic intern, dietetic internship, dietitian, gluten free, instagram, RD2Be, recipe, salad, vegetarian

Greek Salad

Greek salad photo

Greek Salad

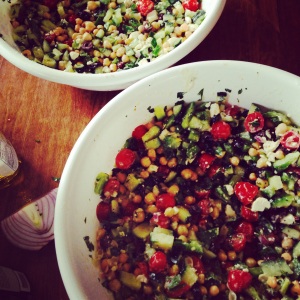
This hearty Greek salad gets even better as it marinates in the dressing. The bright and cheery colors combined with the freshness of the lemon and parsley make this salad a sure crowd pleaser! Pack this up in a to-go container to take with you to work for lunch or as a snack on a long road trip!

Ingredients

  •  1 pint grape tomatoes, cut in half
  •  1 cucumbers, diced
  • 1 green bell pepper, diced
  •  ¼ c red onion, finely chopped
  • 1 cup garbanzo beans
  • ½ c chopped parsley
  • ¼ c Kalamata olives
  •  ¼ c crumbled feta cheese

Dressing 

  • 2 lemons, juiced (about ¼ c)
  • 2 TBS extra virgin olive oil
  • ¼ c nonfat Greek yogurt
  • 1 clove garlic, minced
  • 1 tsp oregano
  • 1 TBS brown mustard
  • 2 TBS chopped red onion
  • Pinch of salt and pepper


Directions

1)    Combine salad ingredients in a large bowl.

2)    Add dressing ingredients to a blender, blending until the dressing is frothy.

3)    Drizzle about ¼ c of dressing over salad and toss to combine. You can add more or less dressing depending on preference.

4)    Eat and enjoy!


Nutrition Facts: Serving size= ¾ cup, 155 calories, 8 g fat, 6 g protein, 327 mg sodium

baking, dietitian, gluten free, instagram, nutrition, paleo, RD2Be, recipe, vegan

Blueberry Banana Muffins

We made these muffins late one night while craving a sweet snack, that wasn’t packaged or filled with cups of sugar (though the thought of a homemade muffin from Primo Passo Coffee in Santa Monica, CA sounds delicious and very needed as we work on our grant proposals!)  The recipe for these muffins were adapted from the blog The Minimalist Baker.  They use minimally processed ingredients and have recipes that meet a variety of dietary needs and preferences.  These muffins were first made on a snowy, day before Valentine’s Day baked good for boyfriend who was flying in the next morning (It was during one of the worst 2014 polar vortex storms- the California intern just about died!).  The simplicity and ease of the recipe makes these muffins great for anyone who is new to the kitchen!

They can be made gluten free, vegan or paleo by switching a few ingredients.  This batch were vegan and were delicious!  We’re still modifying the recipe but thought we would share our modifications and tips with you!

Blueberry Banana Bran Chia Seed Muffins

Ingredients

  • 2 flax eggs (2 TBS flax, 5 TBS water)
  • 3 TBS agave nectar
  • 1/4 c unsweetened apple sauce
  • 2 med ripe bananas
  • 1/2 c frozen blueberries
  • 3 TBS almond milk
  • 1 tsp vanilla extract
  • 1 tsp baking powder
  • 1 c almond meal
  • 1/2 c plus 2 TBS wheat bran
  • 1/4 c chia seeds

Directions

1) Preheat oven to 350 degrees.  Line a muffin tin with liners (recipe makes about 10 muffins)

2) Prepare flax egg.  Add flax and water and let sit for a couple minutes.

3) Add banana and mash.  Add blueberries agave, baking powder, vanilla, applesauce, and almond milk.  During this step we began eyeballing the ingredients.  The muffins aren’t super sweet so you can be flexible in how much agave you add.  Since there are no raw eggs, you can taste the batter for sweetness!

4) Add almond meal and wheat bran and stir.  Be careful not to over mix batter as this can lead to tunneled muffins! (Thank you food science class!)  Depending on how dry or wet your batter is, add more liquid (applesauce/almond milk) or bran.  You can also adjust sweetness here.  We added a little honey at this point.  Add the chia seeds and give one final mix!

5) Fill muffin cups to the top and bake for 30-35 minutes.  Check for doneness by pressing the tops of the muffins.  We found that they were still fairly liquid at this point (still experimenting with the baking temps and ratios of the recipe…will keep you updated!) and turned up the temperature to 450 and baked for an additional 10 minutes.  This did the trick!

6) Enjoy with all natural almond or peanut butter!  Delicious and nutritious!  Great way to Get Your Nutrition On!


We will continue to experiment with this recipe to perfect it!  To make the recipe gluten free, omit wheat bran and use Gluten Free flour (The Minimalist Baker used ground GF oats!) of your choice.  To make paleo, use almond meal flour.


Check out our Instagram feed for photos of the the muffin!  @getyournutritionon