dietitian, entertaining, gluten free, how to

Building A Charcuterie & Cheese Board + Giveaway!

Our most recent cheese board creation.

My boyfriend and I love charcuterie nights. On our first date we split a charcuterie and cheese board- talk about a great way to get to know someone. We bonded over beautiful board of olives and prosciutto and manchego and since then we’ve maintained our hot and heavy relationship with cured meats and delicious cheese. Our dating relationship is going okay too 🙂

One thing that every twenty something should know is how to put together a good charcuterie and cheese board. Here are my tips:

  1. It starts with a good cutting board. I like dark wood that looks aged and unique, drawing attention to your spread.

    My go-to charcuterie board
  2. Charcuterie and cheese. My favorite charcuterie is an aged peppered salami. I try to choose one that is locally produced, with no nitrites, and ethically sourced (if possible). My cheese choices run the spectrum- a creamy, melty brie or a sharp grass fed cheddar.  I also will pick a cheese if the name is interesting, a very scientific approach.
  3. Accoutrements. My go to is whole grain mustard, artisanal jam (I have an amazing blackberry lavender jam that I bought when I lived in New Hampshire), along with olives, mini pickles, local dates, or truffle honey.
  4. The crackers. As a dietitian, I feel it is my duty to get people to eat more fiber so I choose a whole grain cracker with at least 2 g of fiber per serving.

To celebrate my love of charcuterie and cheese boards, I am teaming up with Crunchmaster crackers to offer one follower a 6 variety pack of Crunchmaster Gluten Free Crackers. These crackers go great with charcuterie and cheese but are also a great gluten free option for snacking. I like to bring whole grain crackers and hummus or cottage cheese to work as a mid-day pick me up.
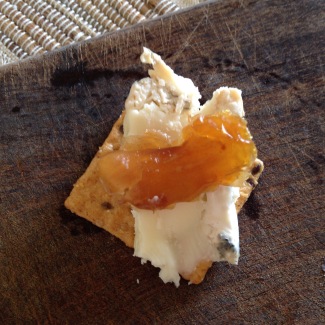
Crunchmaster Multi-Grain cracker with aged local goat cheese and dates

These crunchy crackers are full of whole grain goodness. In my sample pack I received:

  • Multiseed Crackers
  • Multigrain Crackers
  • 7 Ancient Grain Crackers

My favorite were the Mulitgrain Crackers. The serving size was 16 crackers which provided 3 g of fiber and 23 g of carbohydrate. I would recommend them to my diabetic patients for snacks or meals because it would allow them to feel satisfied with a lower impact on their blood sugars. I also liked their light, crisp bite that paired well with my go to dip (cottage cheese with olive oil, black pepper and Hawaiian Red Sea salt).

Here’s how to enter the GIVEAWAY- 

1) Follow me on Instagram (@kari_on_nutrition)
2) Tag a friend and post your favorite cracker combination in the comments. If you post a photo on Instagram of your cracker combination, you will receive 2 entries! Be sure to use the hashtag #KariOnNutritionGiveaway and tag me in the photo (@kari_on_nutrition).
3) Winner will receive a 6 variety pack of Crunchmaster gluten free crackers.

Giveaway will end July 3rd.

Here are some helpful links if you want to try Crunchmaster for yourself!

http://www.facebook.com/crunchmaster
https://twitter.com/luvcrunchmaster
http://pinterest.com/crunchmaster/

Here is a link to a coupon so you can try Crunchmaster!

http://crunchmaster.com/coupon.aspx

Disclosure: Crunchmaster sent me crackers to sample. All opinions expressed are my own. I was not compensated financially for my opinions, featuring Crunchmaster on my blog, or offering the giveaway. 

baking, breakfast, dietitian, gluten free, nutrition, recipe, snack, training

No Bake Protein Oat Bars

Three day weekends are the best! Especially when they fall on a holiday! This past weekend was filled with beach volleyball, friends, love, and absolutely gorgeous So Cal weather. I won’t go into too much detail (especially as I know the East Coast has been decimated by blizzard after blizzard..sorry New England friends!) BUT I thoroughly enjoyed summer weather and beach cruises this weekend.

Matt works a busy schedule so I try to keep granola bars (<10 g sugar, ❤ g fat, and 3 g fiber/serving- a lofty goal!) and other healthy snack options on hand. Today as he was packing his lunch, said healthy items were no where to be found. So to remedy that situation, I made use of some extra sunflower seed butter and decided to make my own granola bars!

Homemade granola bars are SUPER easy and you can control what ingredients you add. Want more protein? Add nuts or protein powder. Fiber? Chia seeds and oats can provide a soluble solution. They are so customizable that it makes you question why you spent $3.99 on that box of granola bars from TJ’s (which I did once I was done making these!) Plus, have you read the label on a protein bar from health food stores? Most have ingredients you can’t pronounce and aren’t the “clean eats” that most active individuals want to put into their body. Instead of spending the money on store bought granola/protein bars, control the ingredients and make your own! It’s healthier and YOU’RE in charge of the additives!

Everything I used in the bars today, I had on hand- that’s how easy they are! Add your favorite mix ins and experiment with what works for you! It literally took me 10 minutes start to finish to make these!

granola bars

No Bake Protein Oat Bars

Ingredients

  • 1 1/2 cup old fashioned oats
  • 3/4 c sunflower seed butter (or any nut butter)
  • 1/2 c pepitas
  • 2 scoops vanilla protein powder (any type, I used whey)
  • 2 TBS chia seeds
  • 2 TBS hemp seeds
  • 1 TBS cinnamon
  • drizzle of maple syrup
  • almond milk

Directions

  1. Add oats, sunflower seed butter, pepitas, protein powder, chia and hemp seeds, and cinnamon, stirring to combine. Mixture with be very thick.
  2. Add drizzle of maple syrup and a pour of almond milk. Combine mixture. It should begin to form together. If it is too thick to stir, add more almond milk.
  3. Combine until the mixture resembles cookie dough.
  4. Line a 9×9 baking dish with wax paper. Press granola bar mixture into dish. Fold over wax papper and remove from dish
  5. Place in the freezer to hardern for 15-20 minutes. Remove and cut into bars. Store in the freezer/refrigerator or airtight container.
blogging, dietitian, dinner, gluten free, running, training

Superfood Wild Rice

image1

Happy New Year and happy new domain! I took the plunge and went all in! I have made it my goal for 2015 to blog more and dedicate some time to learning about WordPress, developing my blog, and web design! I want to develop Kari On Nutrition into a forum for all things nutrition, dietetics, cooking, working out, with some of my life sprinkled in between. So, with that being said, let me know what you are looking to see!

Another goal for 2015…..drumroll…..

About to cross the finish line at the 2013 LA Marathon!

I want to run another marathon! If I keep it to myself, there is no one holding me accountable. However, if I share it on the internet there’s the world wide web holding me accountable, which if I do the math has the potential to be a lot of people! The last marathon I ran was the LA Marathon in 2013. I decided to run 26.2 miles for my 26th birthday and I had one of the best experiences! The course ran through my favorite city and the weather was the most perfect running day ever recorded. I also exceeded my expectations and kept on pace, running it in ~4:24 (chip time). After my lackluster Nike Women’s Half performance in October, I knew I wanted to run another race. What better way to ring in 2015 than with a marathon. I’m still deciding what race to run but am leaning towards staying in California. However, I can always be convinced to travel somewhere fun! 🙂 Any recommendations?

The second part of this goal is that I want to PR! More on that to come in another post though…

My very first marathon! Buzz Johnson Trail Run!
My very first marathon! Bizz Johnson Trail Run!

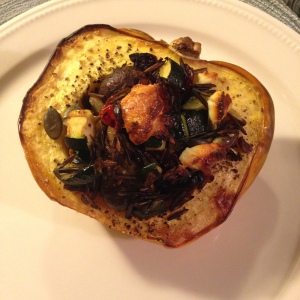
In thinking about marathons and blogging and New Years resolutions and goals comes a pretty amazing and versatile recipe that’s can make any goal seem just a little be easier to accomplish! I was inspired by a recipe I found on Chow and modified to include some superfoods for extra nutrition power! Full of Vitamin E rich pumpkin seeds, cruciferous power house brussels sprouts, and dried tart cherries rich in anthocyanins (anti-inflammatory properties that can help with muscle recovery and improved sleep, among others) this versatile whole grain/fiber friendly dish goes great stuffed in acorn squash, topped on a salad, or eaten as a post workout recovery snack! Plus, you can custimize it with whatever tickles your fancy!

Superfood Wild Rice

Ingredients

  • 8 oz wild rice, cooked
  • 1 1/2 cup roasted cherry tomatoes, mushrooms, and brussels sprouts (Toss in olive oil and roast at 400 degrees for 20-30 minutes-great second meal use for leftover roasted veggies!)
  • 1/4 cup dried tart cherries
  • 2 TBS roasted (unsalted) pumpkin seeds
  • 2 medium zuchinni, diced
  • 1/2 onion, chopped
  • 2 garlic cloves minced
  • 1 TBS coconut oil
  • 1 TBS Herbs de provence (I’m obsessed)
  • Salt and pepper to taste

Directions

  1. Cook wild rice according to directions on the package. Meanwhile, heat coconut oil in saucepan over medium heat.
  2. Add onions and cook until golden brown and translucent. Add garlic and cook until fragrant.
  3. Throw in zuchinni and herbs de provence and cook until softened, about 5 minutes. Remove from heat.
  4. Add cooked wild rice, roasted vegetables, pumpkin seeds, and dried cherries. Stir to combine, season with salt and pepper to taste.
  5. Eat and enjoy!
Acorn squash roasted and stuffed with superfood wild rice! Topped with goat cheese of course!

#karionnutrition

dietitian, gluten free, instagram, paleo, recipe, snack, vegetable, vegetarian

Oven Baked Okra Bites

photo-1

When I drove across the country to move to New Hampshire for my internship last summer, I was obsessed with Cracker Barrel. We don’t have it in California and it litters the highways from Utah to New Hampshire. So I did what every road trippin American should do – I stopped at Cracker Barrel!

Low and behold, I was surrounded with country decor like no other and a menu that had me salivating at every star, puzzle, plowhouse, and dog (a little food service menu design terms a la RD exam studying!). Cracker Barrel was no joke and I was in heaven.

The first time I tried okra was at CB. They were fried (of course) and I may or may not have eaten a few too many. Since this initial introduction to the Southern staple okra, I have been obsessed. During my food service rotation, they served them steamed and I loved their gelatinous but crunchy texture.

When I moved home this summer, I bought some beauties at the farmers market, marinated and skewered them on the BBQ – DELISH.

And now bringing me to today- wanna be Cracker Barrel – oven baked okra fries. I made these paleo, but you can certainly regular flour, buttermilk, add some cornmeal, etc.

photo

Ingredients

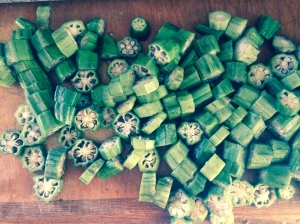
  • 1 pound okra, ends trimmed and sliced into coins
  • 2 eggs
  • 1 cup almond flour
  • 1 TBS garlic powder
  • 1/2 tsp chipotle chili powder
  • 1 tsp black pepper
  • 1/2 tsp cayenne pepper
  • pinch of sea salt
  • 1 tsp red pepper flakes
  • 1 tsp cumin

Directions

  1. Preheat oven to 425 degrees F. Line a baking sheet with foil and spray with cooking spray.
  2. Combine the almond flour with the spices in a shallow dish.
  3. Whisk the 2 eggs in a separate dish.
  4. Create a breading station. Add a few pieces of the okra to the egg wash, remove, and toss in the almond flour mixture. Spread breaded okra evenly on a baking sheet.
  5. Once all okra had been breaded, spray with cooking spray. Bake in the oven for 30 minutes. You may need to rotate the pans to ensure even browning.
  6. Remove when okra is golden brown and crisp. I dipped mine in Frank’s Red Hot! YUM!

Do you like Cracker Barrel? What are your favorite treats? Surprisingly my favorite is the chicken and dumplings…random but they grow on me every time I get them!

breakfast, dessert, dietetic intern, dietitian, gluten free, instagram, nutrition, RD2Be, recipe, salad, snack

Greek Yogurt with Blueberries, Watermelon & Basil

image-2

Summer in LA has brought warm temperatures and a plethora of summer produce. On a recent trip up north to Sacramento, California’s bounty was on full display. I picked up tree ripened nectarines, peaches, apricots, plums, and pluots of every variety along with okra and a sun ripened watermelon! (See our Instagram post last week for more info on how to choose a watermelon!)

I love taking a road trip to Northern California solely so that I can visit all the farms that dot the highways! They have some of the BEST produce I have every tasted and I love that I can meet the person who grew the food that I am about to DEVOUR! This recipe makes a great breakfast, snack, or dessert! The basil adds amazing flavor without having to add extra granola or sweetener. Lots of filling protein from the Greek yogurt and antioxidants from the berries, this recipe is sure to please! Plus the colors are so pretty, how could you resist?!

Ingredients

  • 3/4 c nonfat Greek yogurt (LOVE Fage brand- absolute creamiest nonfat Greek yogurt around!)
  • 1/4 c blueberries
  • 1/2 cup cubed watermelon
  • 2 basil leaves, torn into pieces
  • honey or agave (if desired)

Directions

1) Scoop Greek yogurt into dish. Top with blueberries and watermelon. Sprinkle basil on top.

2) Can drizzle with a little honey or top with homemade granola!

dietetic intern, dietetic internship, dietitian, gluten free, instagram, RD2Be, recipe, salad, vegetarian

Greek Salad

Greek salad photo

Greek Salad

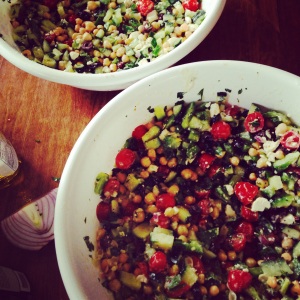
This hearty Greek salad gets even better as it marinates in the dressing. The bright and cheery colors combined with the freshness of the lemon and parsley make this salad a sure crowd pleaser! Pack this up in a to-go container to take with you to work for lunch or as a snack on a long road trip!

Ingredients

  •  1 pint grape tomatoes, cut in half
  •  1 cucumbers, diced
  • 1 green bell pepper, diced
  •  ¼ c red onion, finely chopped
  • 1 cup garbanzo beans
  • ½ c chopped parsley
  • ¼ c Kalamata olives
  •  ¼ c crumbled feta cheese

Dressing 

  • 2 lemons, juiced (about ¼ c)
  • 2 TBS extra virgin olive oil
  • ¼ c nonfat Greek yogurt
  • 1 clove garlic, minced
  • 1 tsp oregano
  • 1 TBS brown mustard
  • 2 TBS chopped red onion
  • Pinch of salt and pepper


Directions

1)    Combine salad ingredients in a large bowl.

2)    Add dressing ingredients to a blender, blending until the dressing is frothy.

3)    Drizzle about ¼ c of dressing over salad and toss to combine. You can add more or less dressing depending on preference.

4)    Eat and enjoy!


Nutrition Facts: Serving size= ¾ cup, 155 calories, 8 g fat, 6 g protein, 327 mg sodium

baking, breakfast, dietetic intern, gluten free, nutrition, RD2Be, recipe, snack

Cranberry Quinoa Power Bars

This recipe makes a delicious heart healthy snack or breakfast option for when you’re on the go. Chock full of omega 3’s, fiber, whole grains, and healthy fats, it’s filled with hearty guilt-free goodness.

Ingredients

  • 2 c cooked quinoa
  • 2 c raw oats
  • ½ c dried cranberries
  • ½ c pepitas (pumpkin seeds)
  • ½ c smooth almond butter
  • ½ c unsweetened almond milk
  • 1/3 c brown rice syrup
  • 1/3 c unsweetened applesauce
  • ¼ c ground flaxseed
  • ¼ c chia seeds
  • ¼ c unsalted sunflower seeds
  • 1 tsp vanilla
  • 1 tsp cinnamon

Directions

1)     Preheat oven to 350 degrees

2)    Toss all ingredients into a bowl and stir to combine

3)    Lightly coat pan with cooking spray. Press into a 8×8 baking dish and put into the oven.

4)   Cook for 15-20 minutes until golden brown.

5)    Slice into bars and enjoy. Store in an airtight container.

For a special heart health treat, drizzle with melted dark chocolate! Dark chocolate has antioxidant properties that may have some benefit to reducing blood pressure.

baking, dietitian, gluten free, instagram, nutrition, paleo, RD2Be, recipe, vegan

Blueberry Banana Muffins

We made these muffins late one night while craving a sweet snack, that wasn’t packaged or filled with cups of sugar (though the thought of a homemade muffin from Primo Passo Coffee in Santa Monica, CA sounds delicious and very needed as we work on our grant proposals!)  The recipe for these muffins were adapted from the blog The Minimalist Baker.  They use minimally processed ingredients and have recipes that meet a variety of dietary needs and preferences.  These muffins were first made on a snowy, day before Valentine’s Day baked good for boyfriend who was flying in the next morning (It was during one of the worst 2014 polar vortex storms- the California intern just about died!).  The simplicity and ease of the recipe makes these muffins great for anyone who is new to the kitchen!

They can be made gluten free, vegan or paleo by switching a few ingredients.  This batch were vegan and were delicious!  We’re still modifying the recipe but thought we would share our modifications and tips with you!

Blueberry Banana Bran Chia Seed Muffins

Ingredients

  • 2 flax eggs (2 TBS flax, 5 TBS water)
  • 3 TBS agave nectar
  • 1/4 c unsweetened apple sauce
  • 2 med ripe bananas
  • 1/2 c frozen blueberries
  • 3 TBS almond milk
  • 1 tsp vanilla extract
  • 1 tsp baking powder
  • 1 c almond meal
  • 1/2 c plus 2 TBS wheat bran
  • 1/4 c chia seeds

Directions

1) Preheat oven to 350 degrees.  Line a muffin tin with liners (recipe makes about 10 muffins)

2) Prepare flax egg.  Add flax and water and let sit for a couple minutes.

3) Add banana and mash.  Add blueberries agave, baking powder, vanilla, applesauce, and almond milk.  During this step we began eyeballing the ingredients.  The muffins aren’t super sweet so you can be flexible in how much agave you add.  Since there are no raw eggs, you can taste the batter for sweetness!

4) Add almond meal and wheat bran and stir.  Be careful not to over mix batter as this can lead to tunneled muffins! (Thank you food science class!)  Depending on how dry or wet your batter is, add more liquid (applesauce/almond milk) or bran.  You can also adjust sweetness here.  We added a little honey at this point.  Add the chia seeds and give one final mix!

5) Fill muffin cups to the top and bake for 30-35 minutes.  Check for doneness by pressing the tops of the muffins.  We found that they were still fairly liquid at this point (still experimenting with the baking temps and ratios of the recipe…will keep you updated!) and turned up the temperature to 450 and baked for an additional 10 minutes.  This did the trick!

6) Enjoy with all natural almond or peanut butter!  Delicious and nutritious!  Great way to Get Your Nutrition On!


We will continue to experiment with this recipe to perfect it!  To make the recipe gluten free, omit wheat bran and use Gluten Free flour (The Minimalist Baker used ground GF oats!) of your choice.  To make paleo, use almond meal flour.


Check out our Instagram feed for photos of the the muffin!  @getyournutritionon